Saad Iqbal | 🗓️Modified: October 24, 2017 | ⏳Read Time: 6 min | 👁Post Views: 965
The Stamped concrete can be defined as a finish that is provided to the concrete in its wet state. Specific designs or patterns are stamped on the concrete in its plastic state as shown in the figure-1 below.
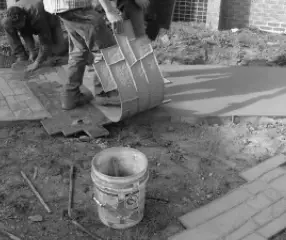 |
| Fig.1. Stamped Concrete Preparation on a Concrete Driveway |
The stamped
concrete provides a great option in terms of realistic colors, textures, and patterns. These will hence end up with a final product finish similar to that obtained from the installation of granite, marble or costlier sandstones or tiles. Thus, stamped concrete provides great option for the designers to choose a design for the floor for various budget and aesthetics.
A greater advancement in the area of stamped concrete have resulted in the development of new patterns similar to the stone patterns.
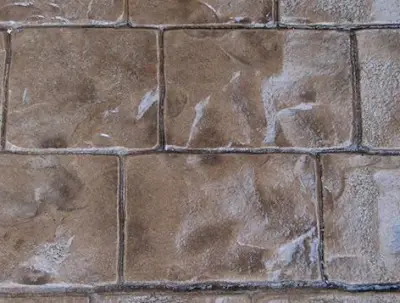 |
| Fig.2. Stamped Concrete Finish similar to Stone Patterns |
The use of stamped concrete will help in achieving the appearance of an imported stone for a lower cost.
Stamped Concrete Construction
A teresting texture is provided by the application of stamped finish for the sidewalks, patios, and driveways. The main design element for the process is stamping mats. The figure-3 below shows some of the rubber – stamping mats that are available. There are numerous designs of stamping mats in the market.
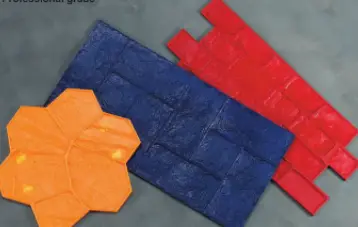 |
| Fig.3: Stamping Rubber Mats with Hexagonal, brick and square patterns |
Along with the decision of implementing stamped concrete, it is very necessary to bring a decision on the layout of stamping and the
type of stamping pattern that will suit your floor. This will help in maintaining a consistent pattern throughout the course of the project.
To maintain a consistent layout, a reference line is made during the stamping of the initial stamping mat. Further stamping can be carried out with respect to the initial reference line hence achieving proper alignment and consistency. Each stamping mat will be aligned with the before stamped layout. This method is followed till the end of the project.
The textures at the corners of the stamped portion mostly have to be finished by hand. Necessary obstructions can be created on the surface with the help of special stamps or by using an aluminum chisel.
The stamping pads is pressed with pressure over a concrete surface that is in its plastic state (slightly stiff) to a depth of 1 inch.
Stamping a Concrete Surface
The process of stamping a concrete surface can be conducted by the following step by step procedure.
Step 1: To a prepared formwork, the
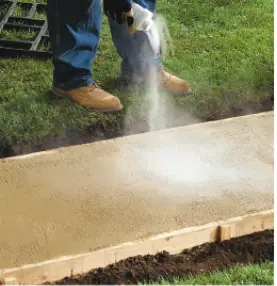
concrete of required mix ratio is poured and leveled to form a concrete slab. A reference line is made at the point where the first mat is intended to be placed or at the center of the form. The time we observe that the bleeding water has disappeared from the surface of the slab, a release agent in the form of powder is tossed on its surface. The amount to be tossed is dependent on the instructions given by the manufacturer. The procedure is shown in the figure-4.
 |
|
Fig.4: Preparation of Concrete Surface for Stamping
|
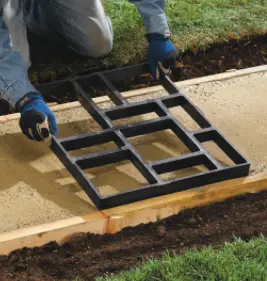
Step 2: Next is the process of aligning the stamping mat of desired pattern over the prepared concrete surface as shown in the figure-5.
 |
|
Fig.5: The first Stamping of the concrete Surface
|
The stamping mat is aligned with respect to the reference line made and based on the layout plan. It is to be noted that once the mat is placed, no kind of adjustment have to be conducted. The mat can be pressured and embedded into the concrete either by stepping over it or by tamping with hand.
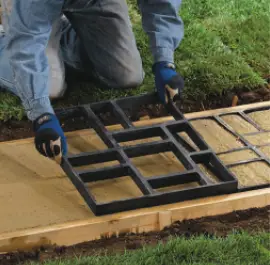
Step 3: Now the second stamp is taken and placed against the first as shown in figure-6. And if there are many stamps of the same pattern, it can be embedded in the continuous pattern. If only one mat is available, after each stamping, the mat have to be removed and continue the stamping.
 |
|
Fig.6: Placement of Second pad for stamping the concrete
|
If we have to reuse the mat after each stamping, then it is suggested to complete row-wise first before finishing lengthwise.
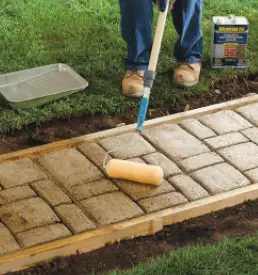
Step 4: Once the stamping procedure is over, the surface is cured for 3 days. The releasing agent that is used can be removed with the help of pressure washer. Then a complete curing can be performed for the concrete surface for a time period of 1 week. Finally, as per the manufactures, an acrylic concrete sealer can be provided. After which the formworks and the backfills can be removed, as shown in figure-7.
 |
|
Fig.7: Finishing the Stamped Concrete with a Concrete Sealer
|
Based on the aesthetic views of the worker or as desired, more and more detailing works can be performed on the stamped concrete with a roller to defined each block, or texture skin that will provide the look of a natural tile or a stone. Most of the professional stamping pads with give complete finish for the concrete surface.
Tips while Stamping Concrete
Some essential tips can be followed before you work with a new stamping pad or if you are new in stamping concrete.
- Before working on concrete, we can apply the pads on a bed of compacted sand.
- Always try to bring random designs. Avoid placing the stamping pads in a repetitive pattern.
- Better results will be obtained if we use a releasing agent. This will help to avoid any kind of breakage of concrete while taking out the stamping pads.
- Check the alignment of the stamping pad periodically.
- The person who is working over the concrete surface, performing the stamping procedure must wear a boot or work shoes that is clean. It must be free from debris, pebbles or other dirt. Or else these contaminants will also be impressed over the concrete surface.


